How to Recall an Email in Gmail? A Step-by-Step Guide to Unsend the Messages in Gmail
At some point in life, you must have come across the inevitable, i.e., the fear of sending a faulty email. You wish you could just recall a message in Gmail and save yourself from embarrassment.
Similar to recalling an email in Outlook, Gmail allows you to use the ‘Undo Send’ feature within a set time limit. Thus, today, we are going to discuss how to recall an email in Gmail using this feature. Curious to know more? Let’s dive in!
What is the Need to Recall Messages in Gmail?
The need to recall an email, i.e., undo send, arises for various reasons. Here are some common reasons why people feel the need to recall an email:
- Spelling mistakes or typos in the email content.
- Accidentally sent a draft with half the information.
- Wrong attachments in documents.
- Didn’t include the key message or the important information.
- Message sent to the wrong recipients.
- Incorrect reply because of a hurry.
- Accidentally revealed personal information.
Now, that we have learned the need to recall messages, let’s move on to how to recall a message.
Also read: How to Create a Group Email in Gmail? Effective Ways (2024)
How to Recall a Message in Gmail After It Has Been Sent?
Instead of recall, Gmail has a feature to undo send messages that serve the same purpose.
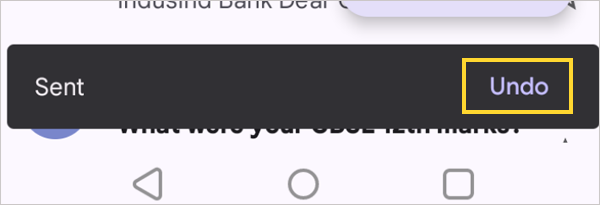
So, how it works is: When you send an email, you see a pop-up tab at the end of the page. Your message doesn’t reach the recipient’s mailbox until this tab disappears from your screen. Queuing your email, this tab contains the options to undo and view the message. Thus, when you click on Undo, the email goes back to the drafts.
Note:
- You have only 30 seconds to undo the message.
After 30 seconds, the tab will automatically disappear, and you will be left with no other solution.- You can adjust or decrease this time limit by visiting the default settings in Gmail.
Here’s how to recall Gmail email using the undo send feature:
On the Web:
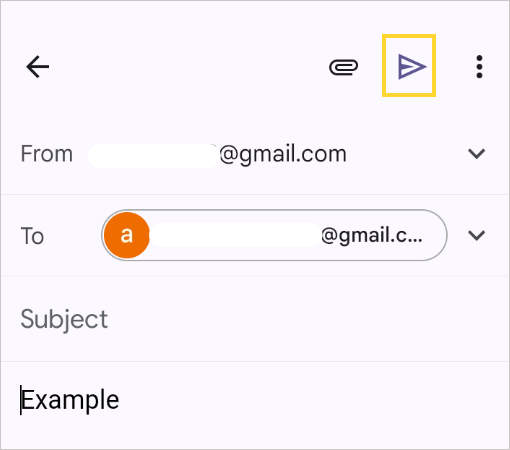
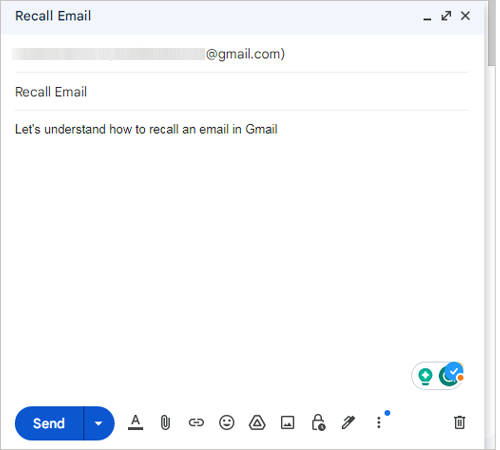
- Open Gmail and log in.
- Click on Compose.

- Now, type your message and hit send.

- Now, you will see a pop-up tab.
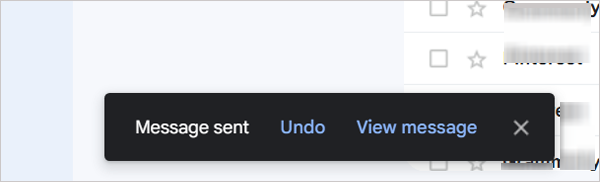
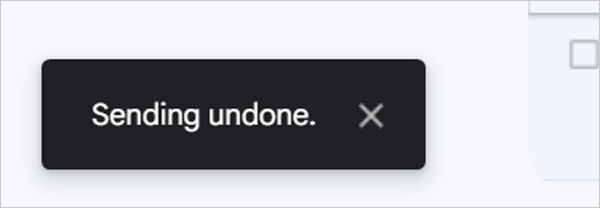
- Click on the Undo button to retrieve the email.
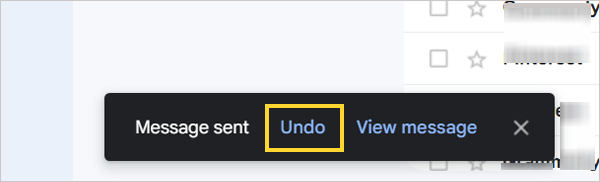
- Your message was successfully retrieved in Gmail.
Now, let’s look at the process of recalling the emails on the mobile app.
On the mobile app:
- Open the Gmail app. Click on Compose.
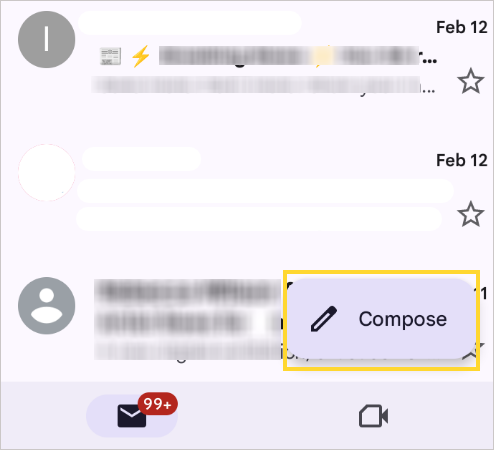
- Type in your message and hit send.
- Now, you will see a pop-up tab at the bottom of the page.
- Click on Undo, and you are done.
These steps are pretty simple and don’t require a lot of hustle. Moving on, let’s look at how to modify the time limit of the Undo Send option in default settings.
How to Change the Cancellation Period to Undo the Messages?
As discussed above, the Undo Send option disappears after a set time limit, which is 30 seconds. The cancellation period can go as short as 5 seconds, which is hardly enough to undo an email. Thus, if your account’s time limit is below 30 seconds, consider changing the send cancellation period in settings. Here’s how to do it:
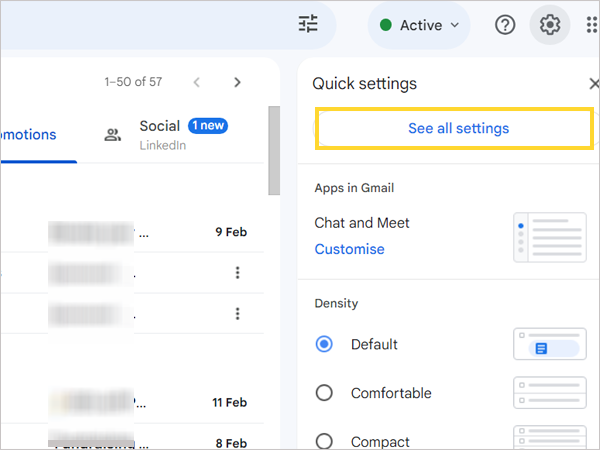
- Open Gmail and log in.
- Click on the settings gear, and then select See All Settings.
- Now, on the General tab, you will see the Undo Send menu.
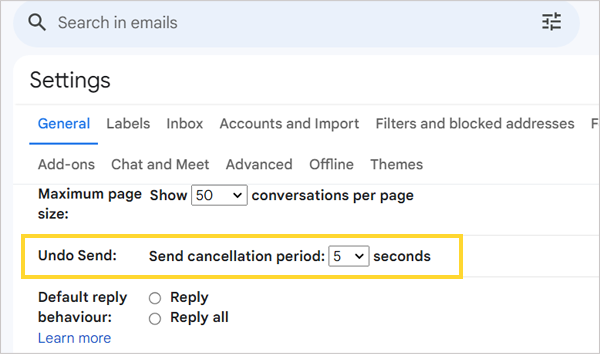
- Click on the box and choose 30 seconds from the menu.
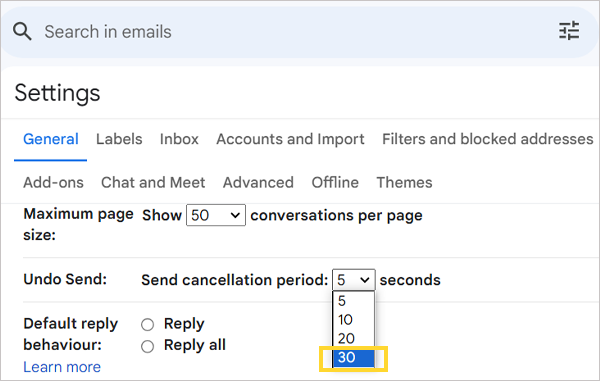
- After that, go to the end of the page and click on Save Changes.
Finally, your undo send time limit is now set to 30 seconds.
Also read: How to do Gmail Search by Date: Ultimate Guide to Find the Older Emails in 2024
Alternatives to Recall Email Gmail
Apart from the Undo feature, there are several alternatives to the recall feature in Gmail. By enabling them, you can eliminate the mistakes and rectify the errors in your email. These features are described below:
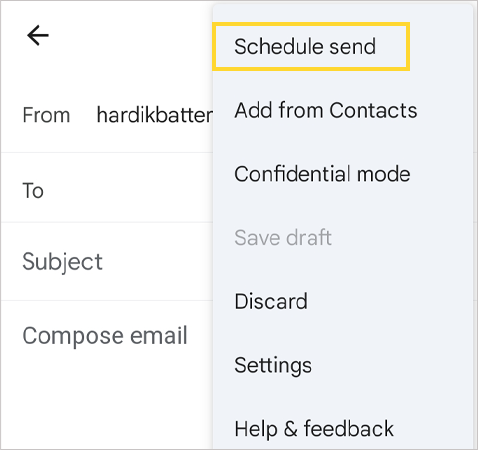
Schedule Send
This option gives you some extra time to make changes in your email even after you have clicked the Send button. To turn on the Schedule Send and set the time limit, follow the given steps:
- Open the Gmail app > draft the email > add the recipient ID in the ‘To’ section.
- Then, tap on the three vertical dots given in the top right corner of the same page.
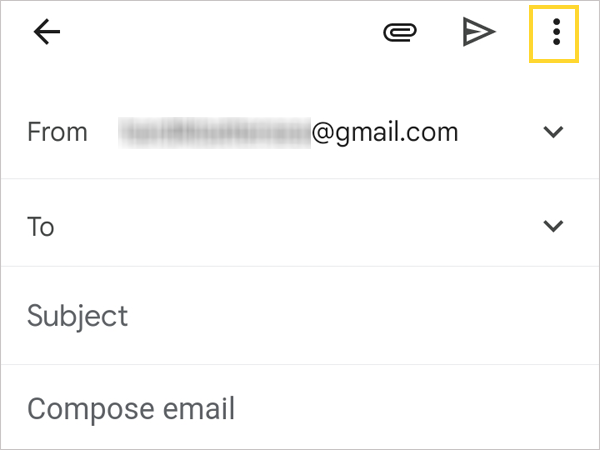
- From the displaying list, tap on the ‘Schedule Send’ option.
- Now, you can select any one option from the available schedules or create one by tapping on ‘Pick date & time’.
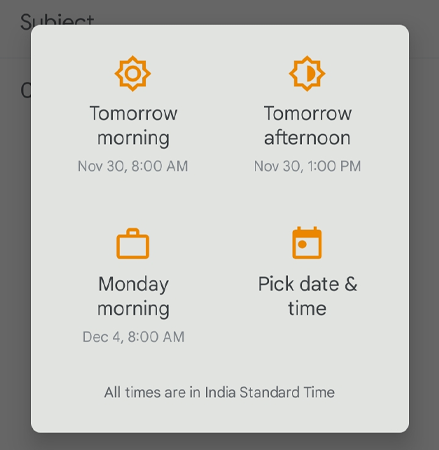
Note: Once the Schedule Send time limit is over, your email will automatically get delivered to the recipient/s.
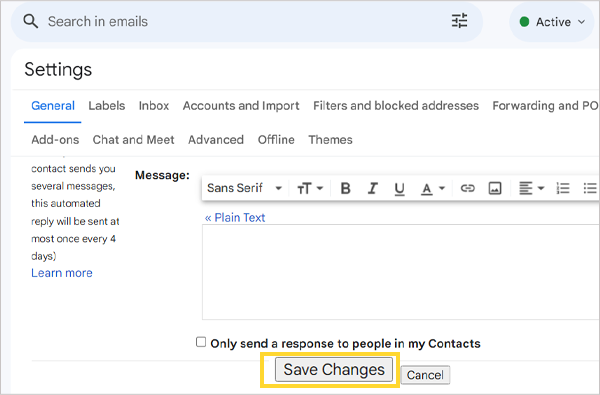
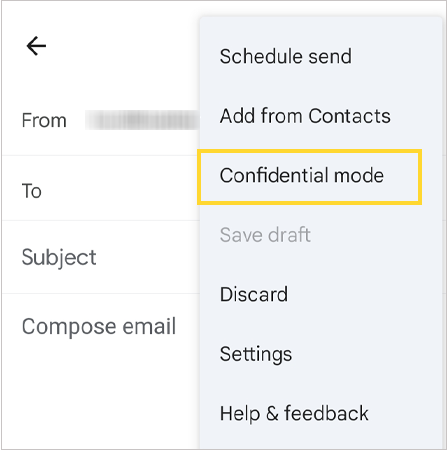
Confidential Mode
As the name suggests, this mode is highly useful for confidential emails. Here, you can set an expiry period and once the period is over, the sent email will automatically get deleted from the recipient’s inbox. This will help protect your personal email content from being misused.
To turn on and adjust the confidential mode, follow the steps given below:
- Compose the email and then tap on the three vertical dots icon given in the top right corner of the page.
- Select ‘Confidential Mode’ from there.
- Now, turn on the mode and set the expiration period as per your needs.
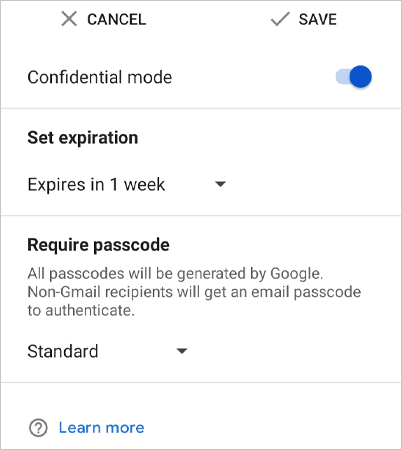
- At last, tap on the Save option at the top of the page.

Note: You can set the Confidential Mode’s expiration period to 1 day, 1 week, 1 month, 3 months, and 5 years.
To follow up on these emails, you can sort Gmail by size, star mark them, or apply other filters to figure out easily. This will also help you find unread emails in Gmail.
Confirm Before Sending Option
You can also set one more confirmation step before sending the email. If you mistakenly click on the Send option while writing an email, a confirmation button will appear before the message gets delivered. This will limit the need to recall an email in Gmail. Here is how you can get this feature:
- First, open the Gmail app on your Android device, and tap on the three horizontal lines icon in the homepage’s top left corner.
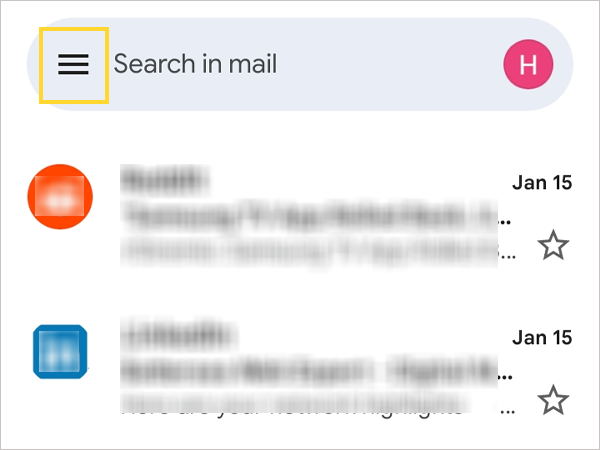
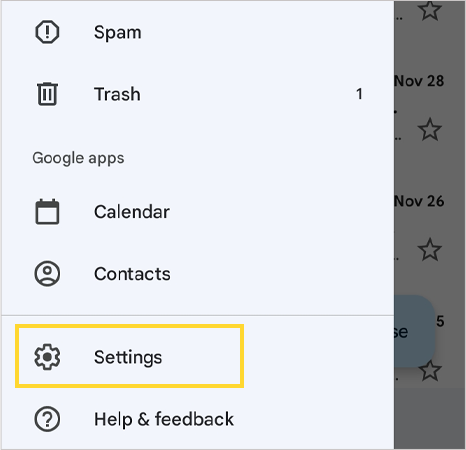
- Scroll down to the end of the menu bar and select the Settings option from there.
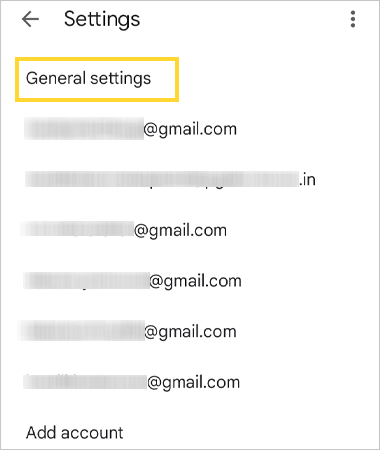
- Tap on General Settings on the next page.
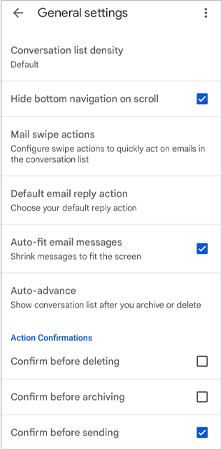
- Finally, scroll down to the end of the page, and tap on the ‘Confirm before sending’ checkbox next to it.
Note: All these alternatives can only be useful if you are attentively working on the email and proofreading it before and after sending it. Otherwise, you’ll not be able to catch the error in your work.
How to Recall an Email in Gmail When the Undo Option is Not Available?
The only downside of the recalling function on Gmail is the undo cancellation timeframe. You get only 30 seconds to undo the sent messages. If you can’t realize your mistakes during that period, the only thing left to do is regret.
To tackle this, simply follow the tips mentioned below:
- Set a routine and proofread all the emails you send. This habit might prevent future accidents while emailing.
- Write your emails in Google Docs or Microsoft Word. The writing software allows you to double-check the content of your message.
- Take your time while composing emails. A calm mind will help you understand the context better and reply according to it.
- Always double-check your recipient list before sending out emails. Look out for any typos in the email addresses.
- Make sure the attachments are functioning properly. Also, look out for the maximum attachment file size, which is 25 MB.
- You can also consider the feature of scheduling the emails for later. It helps you catch the errors on time and act accordingly.
It’s human nature to make mistakes. Thus, when you make mistakes, send a sorry letter following the incorrect email. You can also retype the email again and apologize for the mistakes in the follow-up email.
Conclusion
The undo send feature indeed allows you to recall Gmail messages, but the cancellation time doesn’t leave you with many options. Hence, you must consider this time limit while recalling the email on Gmail.
Another option to avoid these situations is to follow the above-listed tips while composing an email.
Remember that human error is natural. So, don’t stress yourself out, and following these tips might help you in the long run.
Read next: How to Change Gmail Background? [Step by Step Guide]
FAQs
Ans: To recall email Gmail:
- After you compose an email and hit send, you will see a pop-up tab at the bottom of the page.
- On that tab, click on Undo, and you are done.
Ans: No, you can’t undo the email after a day. You can only undo it during the cancellation time limit, which is 30 seconds.
Ans: Unfortunately, you can’t undo an email after an hour. You can only retrieve it in 30 seconds.
Ans: If you undo the email in 30 seconds, then it won’t reach the recipients. However, if you reach that time limit, the email is bound to reach your recipient’s mailbox.
Source Links: