How to Create Folders in Outlook? Key Tips for a Clutter-Free Inbox in Outlook
Although Outlook allows users to enjoy various features, sometimes it becomes quite hectic to manage the countless emails along with the calendar and tasks.
To address this issue, the best option is to create folders. Creating folders in Outlook helps organize your emails and keep the inbox uncluttered. It also helps you take prompt action, prioritize urgent emails, and deal with spam emails.
This article is going to show you how to create folders in Outlook. Also, we will provide you with effective tips to manage the folders in your mailbox. So without further ado, let’s get started.
Why Should You Create Folders in Outlook?
Creating folders in Outlook enables you to organize messages, contacts, calendars, and tasks.
Using this feature will keep your email inbox organized. Furthermore, it makes sure you are not missing out on any crucial emails. A sorted inbox fosters a place for productivity. Hence, you can create numerous folders to sort out the emails.
Moving forward, let’s see how to create a folder in Outlook in the next section.
Also read: 4 Easy Methods to Back up Your Gmail Account
How to Create a Folder in Outlook?
Creating folders in Outlook is considered to be a basic task; hence, it’s pretty easy. Thus, today we are going to discuss how to create a new folder in Outlook on the web, email client, and mobile app. Check out the subsequent section to learn more.
On the Outlook Web
It’s pretty easy to create a folder on Outlook.com in comparison to the other methods. Let’s see how to add a folder in Outlook Web.
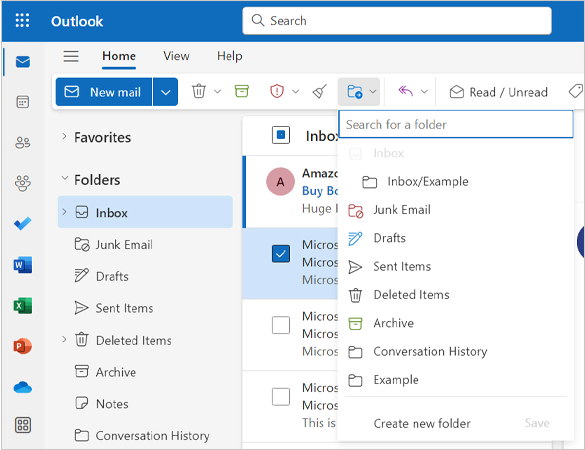
- Open Outlook on the web.
- Click on Create new folder from the menu on the left side. You can also right-click on the folders and select Create new folder from the drop-down menu.
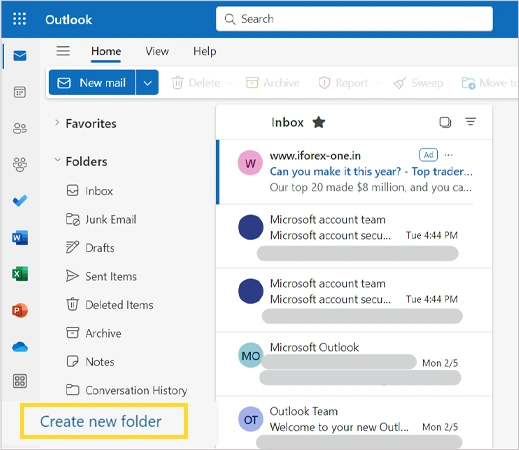
- Now, name the folder.
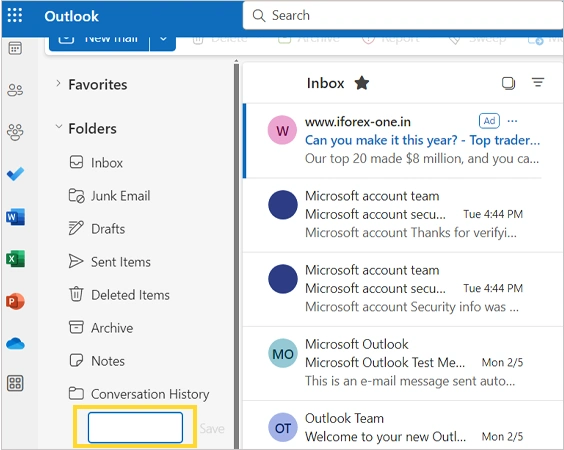
- Finally, press Save and you have created a folder in Outlook Web.

In the next section, let’s see how to create folders in Outlook’s desktop client.
On the Outlook Email Client
Outlook has various versions, however, the steps to create a folder are identical in every version. Thus, you can follow the same steps to create a folder on the Outlook desktop client. Here’s how to create a folder in the Outlook email client:
- Open the Outlook email client on your desktop.
- Now, right-click on your email account.
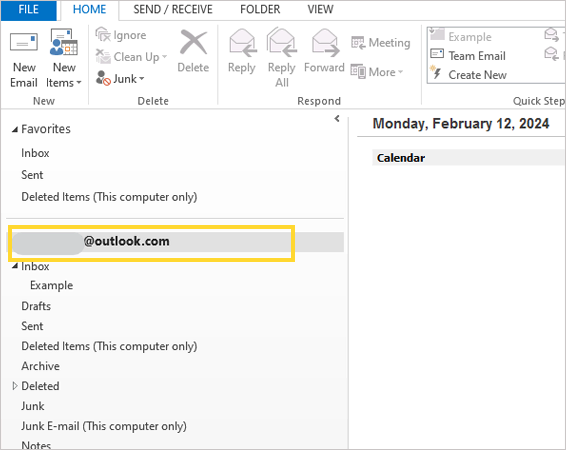
- Select the new folder from the drop-down menu.

- Name the folder and press enter.
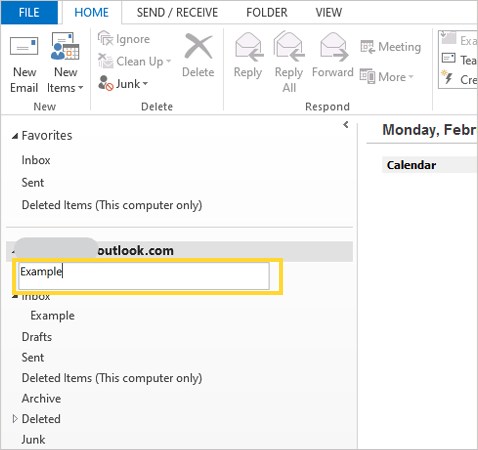
- Now, you have created a new folder on the Outlook email client.
Note:
To create a sub-folder in the Outlook email client, right-click on the inbox and follow the same process.
On Outlook Mobile App
The method to create a folder on the mobile app is relatively different. However, you don’t need to worry, as it only requires a few minutes. Here’s how you can do it:
- Open the Outlook app.
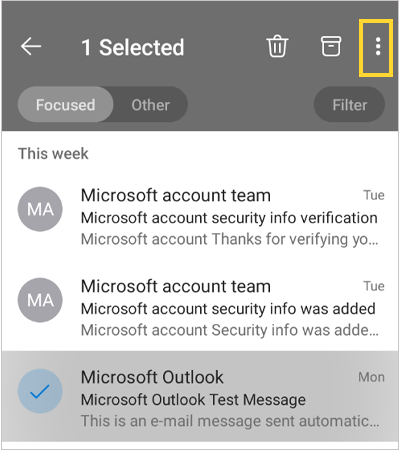
- Now, press and hold to select a message that you wish to move to another folder.
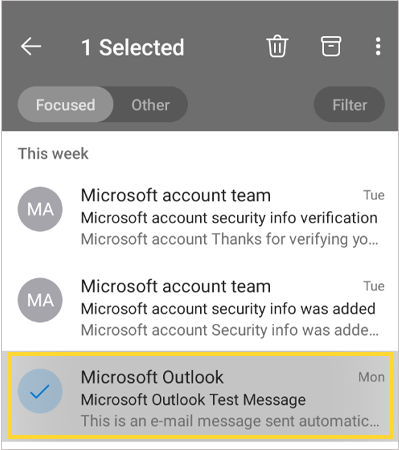
- Now, click on the three dots located in the top right corner.
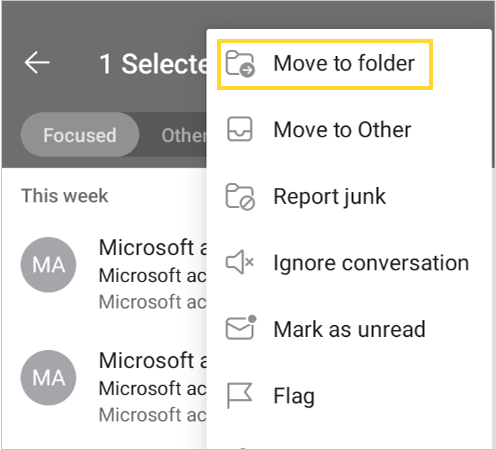
- From the menu, click on Move to Folder.
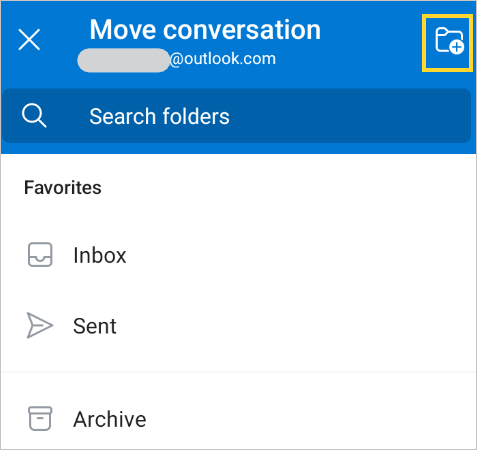
- Now, you will see a new page. Click on the folder icon in the top-right corner.
- Now, name the folder.

- After naming the folder, tap on Create & Move to proceed.
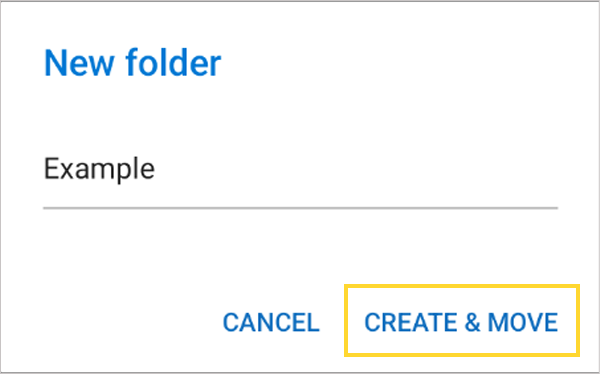
Finally, you have created a new folder on the Outlook mobile app.
Note:
To create a sub-folder on Android or iOS, users need to visit Outlook.com, as there isn’t much you can do on the mobile app.
See how easy it was to create a folder. Now, let’s look at how to manage these folders efficiently.
How to Manage Folders in Outlook?
Managing the folder is a crucial part of maintaining a well-sorted inbox. Thus, Outlook provides users with various tools to sort out their inboxes, like creating a template in Outlook. Hence, we are going to look at some effective ways to manage the folders.
Move Emails to Another Folder
After creating a folder in Outlook, the next step is to move the emails to the folder. This method involves manually selecting the messages and moving them to the desired folder. To do that:
- Select a message you wish to move. Now, click on the ‘move to’ icon in the tool strip.
- Select the folder where you wish to move the email.
- Now, the selected email will move to the desired folder.
Note:
You can also use automated rules to move emails to another folder. However, Outlook mobile app users must visit Outlook.com to set up the automated rules to move emails.
Add the Folders to Favorites
If you frequently work with a specific folder, then consider adding it to your favorites. For that:
- Right-click on the folder you want to add to your favorites. Then, click on Add to Favorites from the drop-down menu.

- Now, your folder is added to the favorites.
Note:
To mark the folder as favorites in the Outlook mobile app, open the app and click on the edit icon in the menu. Now, click on the star beside the folder to add it to your favorites.
Create Folders According to Priority
You have the freedom to create folders based on the urgency of the emails. For example:
- Create a folder named Urgent Emails to keep the messages that require urgent replies.
- You can also make a read-later folder to keep the trivial emails.
This whole process is a matter of personal choice, so prioritize your requirements.
Delete a Folder
Deleting unnecessary folders is part of keeping the mailbox organized. It doesn’t require much hustle; simply follow the steps below.
- Right-click on the folder you wish to get rid of.
- Click on the delete folder from the menu.
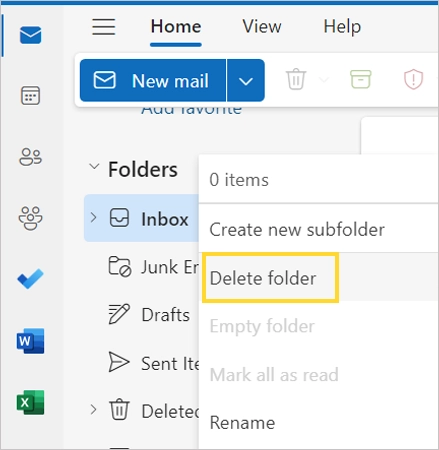
- Boom, your email is deleted.
Note:
When you delete a folder that contains messages, all the messages are bound to end up in the trash.
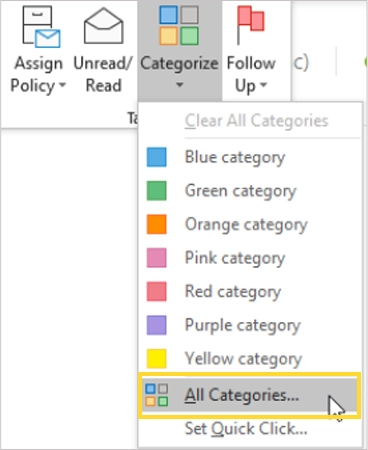
Use Categories
Categories allow you to label and sort messages in Outlook. You can add as many as you want, whether by choosing from the default categories or creating a new one. Let’s see how you can add those:
- Open the Outlook client on your desktop and head to the tags section at the top of the toolbar. Now, Click on Categorize.
- From the drop-down menu, select all categories.
- Now, from the pop-up tab, click on New.
- Name the category and choose the desired color. Then, press OK.
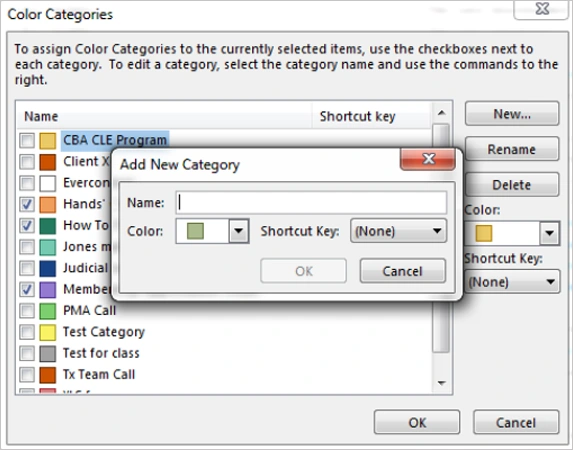
- Your new category has been successfully added.
Make sure to remember these tips to streamline your emailing practices. It will assist you in the efficient management of the folders.
Also read: How to Create a Group Email in Gmail? Effective Ways (2024)
Conclusion
You should have learned how to create folders in Outlook by this point. It is very convenient for people looking to achieve enhanced organization in their Outlook inbox. Hence, adopting these methods will ensure you maintain a decluttered inbox that doesn’t strain your productivity.
As discussed before, you cannot do much on the Outlook mobile app. Hence, if you are unable to access any feature on the app, visit Outlook.com on your mobile web.
Additionally, you can also create sub-folders or labels to tidy up the pile of messages. It will help elevate your efficiency in email management.
Also read: How to do Gmail Search by Date: Ultimate Guide to Find the Older Emails in 2024
FAQs
Ans: To create new folder in Outlook:
- On the web: Right-click on the folders and click on the Create new folder option from the menu. Name the folder and press save.
- On the Outlook email client: Right-click on the Inbox and select Create New Folder from the menu. Name the folder and press enter.
- On the Mobile app: Select a message that you wish to move to the new folder. Now, click on the three dots and select Move to Folder. Click on the folder icon in the top-right corner. Name the folder and tap Create & Move.
Ans: To create a subfolder in Outlook, right-click on the existing folder. Now, choose the Create new folder option from the menu, name the folder, and press enter.
Ans: To find the folders in the Outlook email client: Locate the Search Folders options in the left panel. Now, click on that and click on the New Search Folder menu.
Source Links: